How you fit wood flooring can have a significant impact on how good the end result looks and how it performs and wears over time. Make sure that you take account of the following key points when fitting your wood floor to get the best results possible.
Board Direction
Conventionally, and to show them off to their best advantage, wood flooring planks are laid towards the primary natural light source and along the length of the room. Whlst this may not always be possible - if the largest window is on the longest wall for example, or you want to fit the floor to joists and these run along the length of the room, in most cases you will have a choice so it is important to consider what you would prefer and make sure whoever is fitting your wood floor is aware of this. If there are limitations such as joist direction there may be ways around this so do discuss it with your fitter - or us if you would like some advice.
Board Selection
If the wood flooring you choose features significant variation, board selection will be an important part of the fitting process. Boards will need to be selected thoughtfully to make sure that the variation is evenly distributed across the floor so that you get the best result and create a floor with a natural feel.
The best way to do this is to spread a good proportion of the wood flooring out prior to installation so that you can decide on the way you want to distribute the variation. You should then discuss this with whoever is fitting your floor so that they can select boards appropriately to achieve the result you want.
First Line
The first row of any wood floor sets the line for rest, so it is crucial that this is square. Before laying a plank floor floor, it may be necessary to cut the boards in the first row along their length to compensate for off-square walls. If you are glue-fixing floorboards, make sure that the first row is stable (that the adhesive has gone off) before pushing against it to fit the next one.
End Joints
The end joints in adjacent rows of plank wood flooring must be staggered by at least 150mm apart. We recommend a minimum of 250-300mm as this looks so much nicer, and for the best aesthetic result we would suggest keeping the end joints reasonably random by cutting different lengths of board to start rows.
Gaps Between Boards
There will almost always be some slight gaps (1mm or so) between boards when you fit an acclimatised solid plank floor. This is a natural feature of solid wood flooring, so don't clamp the boards to try and remove the gaps as this can cause expansion problems later on. Occasionally you might find a board that creates a bigger than normal gap due to minimal machining variations or uneven acclimatisation. To solve this cut it in half and use it to start or finish a row.
The Expansion Gap
To accommodate natural expansion and contraction in wood flooring a 15mm expansion gap is required around the entire perimeter of the room; This applies to both solid and eningeered wood flooring and includes doorways, fireplaces, and any other ‘obstacles’ adjacent to the floor. Pay particular attention to door liners & plinth blocks which must either be cut to create an expansion gap under them, or have one left around them. For wood floors in excess of 6m wide, additional expansion of approx 1mm (penny gap) per metre width will also need to be integrated evenly across the floor.
To create an expansion gap, insert wedges between the edge of the wood flooring and the wall as you fit. These can be easily cut from offcuts of flooring. Once fitting is complete and any adhesive is dry, you can remove the wedges and either cover or fill the gap (see below). To create additional expansion across the floor, insert a thin separator between the boards as you knock them together (approx every third board for wide boards and every fifth board for narrow ones).
To cover the expansion gap once you have finished laying the wood flooring, either fit new skirting or fit beading onto existing skirting (fig 1). When butting up against existing thresholds, fireplaces, quarry tiles, brick or staircases you can fill the gap with cork strip for a neat finish. This also works well if you are fitting your wood flooring against curved walls.

Floor Levels & Thresholds
To maintain the expansion gap at doorways you will need to fit a threshold. Where there is no change in floor level between rooms you can either use a level threshold or T bar leaving half the expansion gap either side of the fixing strip, or a cut a level threshold board from the wood flooring and fit this with an expansion gap will with cork strip on either side.
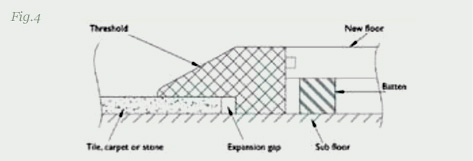
Where the floor levels differ between rooms, use an adjusting threshold to simply accommodate the transition. We have standard adjusting thresholds for variations of up to 15mm and can make them to measure for larger differences. Standard thresholds should be fixed as fig 2 leaving the expansion gap underneath. Made to measure thresholds up to 15mm should be fixed as fig 3 with a cork strip either side to maintain the expansion gap. Thicker thresholds can be stepped with the expansion gap beneath as in fig 4 or square with a cork strip as in fig 5.



Matwells
To avoid wood flooring being damaged by dirt and grit brought in from outside, we recommend fitting matwells at any regularly used entry doors. Unlike mats alone which have a tendancy to move or catch on doors, matwells are cut into the wood flooring so that the mat sits flush with the surface and stays in the right place to protect the finish.
Matwells look most attractive set forward slightly (say 100mm) from the doorway and ‘framed’ with edging strips that match or contrast with the wood floor. Matching frames can be cut from the wood flooring and contrasting ones can be ordered separately. They should always be well fixed and mitred at the corners.
We supply coir matting for matwells in the same depth as our solid and Strata engineered wood flooring. This can be easily cut to the required size and replaced when it wears.


